
So….. I’ve bought another project bike I really most certainly do not need. It’s old, quite impractical, British, quirky as hell, doesn’t really meet the specific need I tried to justify its purchase with …… and it’s cost me far to much money. It is however an absolute hoot to ride and that makes its failings almost forgivable, at least in my own head.
So what have I bought this time ? and what was the twisted rational? Well I shall cover the ‘what’ first : This ladies and gentlemen is a Moulton Mini made sometime probably around 1966.

Yes, its small, a truly horrible shade of badly hand painted green and has really tiny wheels. This is the ‘as purchased’ picture. It came complete with drop bars, mouldy foam grips, a flat perished back tyre that looked almost as old as the bike and a chain so rusty it hardly moved. I’m not going to reveal exactly how much this classic steed cost me, but it was of course far to much. In my defence it did look much better in the listing pictures and was even described as ‘ready to ride’ Hmmmmmmm……. I really should have walked away, but a deal is a deal, the vendor convinced me it just needed and new rear tube and he did knock a token amount of the price.
Right, a quick explanation for the 99% of people who I’m guessing have never heard of these machines. The Moulton Mini was produced from about 1966 as a smaller variant of the slightly larger Moulton ‘F’ Frame series of bikes. These bikes where apparently exactly 7/8 scale smaller than their bigger siblings and used 14 inch wheels instead of 16 inch. They retained the clever linear front suspension which was housed internally in the long headtube, and the rear swing-arm featured rudimentary suspension provided by a rubber block.
Moulton’s of this era are considered mildly collectable these days with the full sized F frame models commanding decent prices if in original condition. The Mini however is considered somewhat less desirable mainly because of the difficulty in finding spare parts for its odd wheel size. I of course because I’m an idiot didn’t realise this when I bought the bike because I totally failed to research the differences between models properly, in fact I only noticed it was a Moulton Mini when I got the bike home.
Now the ‘why’. Well, I needed a bike that was going to fit in the confines of my narrowboat so it obviously had to be small. ‘Just buy a Brompton’ I hear you cry, well I did have a Brompton folding bike a few years ago on the boat and in many ways it was a good solution, apart from one massive flaw, it was simply horrible to ride. Yes, yes I know people ride them hundreds of miles a year for commuting and love them, but I always found them a harsh, twitchy steering, heavy and under geared pain. In the end I sold the Brompton because I disliked riding it so much it never got used. The rational behind the Moulton was that hopefully it would provide a much nicer riding experience, it’s suspension would make it much more usable on the canal towpath and with a bit of luck it would still be small enough to tuck away behind the sofa on the boat. That at least was the plan.

The first thing I had to do was get it ridable. Tyres and inner tubes the right size for these bikes are virtually unobtainable these days. They use 14 x 1 -3/8″ tyres which I guarantee your local bike shop will not stock. even eBay was coming up dry. Eventually I tracked down a set at the UK’s one stop shop for esoteric bike bits nobody else has SJS Cycles whose website is a godsend for stuff like this. When I removed the rear tyre the cause of the many holes in the inner tube was revealed. Yes, I’m pretty sure that spoke shouldn’t be sticking up like that…… in fact several spokes were protruding a fair way into the rim which also on closer inspection had some worrying cracks around the spoke holes.
More internet searching revealed new rims, hubs or even whole wheelsets where also completely unobtainable so I made the best of a bad job and tightened and trued the wheel as best I could and then filed any remaining spokes down that were sticking where they shouldn’t. I then covered this bodgerey with lots of rim tape, refitted the tyre and tube and hoped for the best.
A few tentative trips around the block revealed a few problem’s with my new ‘bargain’ steed. The first and probably the most urgent issue was a distinct lack of braking action at both ends. The old school deep drop single pivot callipers flexed appallingly whenever they were applied and the reduction in forward velocity was marginal at best, oh and the rear brake mounted on top of the rear swing arm was rubbing on the chain anyway. The second problem was the comically low gearing. Originally the bike would I think have been supplied with a three speed Sturmey Archer hub gear. Than was long gone and some bright spark of a previous owner had retro fitted a 5 speed freewheel and cheap derailleur at the rear coupled to what looked like the original cotter pinned crankset. This interesting combination meant even the highest gear was ludicrously low resulting in any speed much above a fast walk required a cadence that even Lance Armstrong on his most drug fuelled day would have struggled to maintain, oh, and one of the pedals was practically seized solid onto its axle.
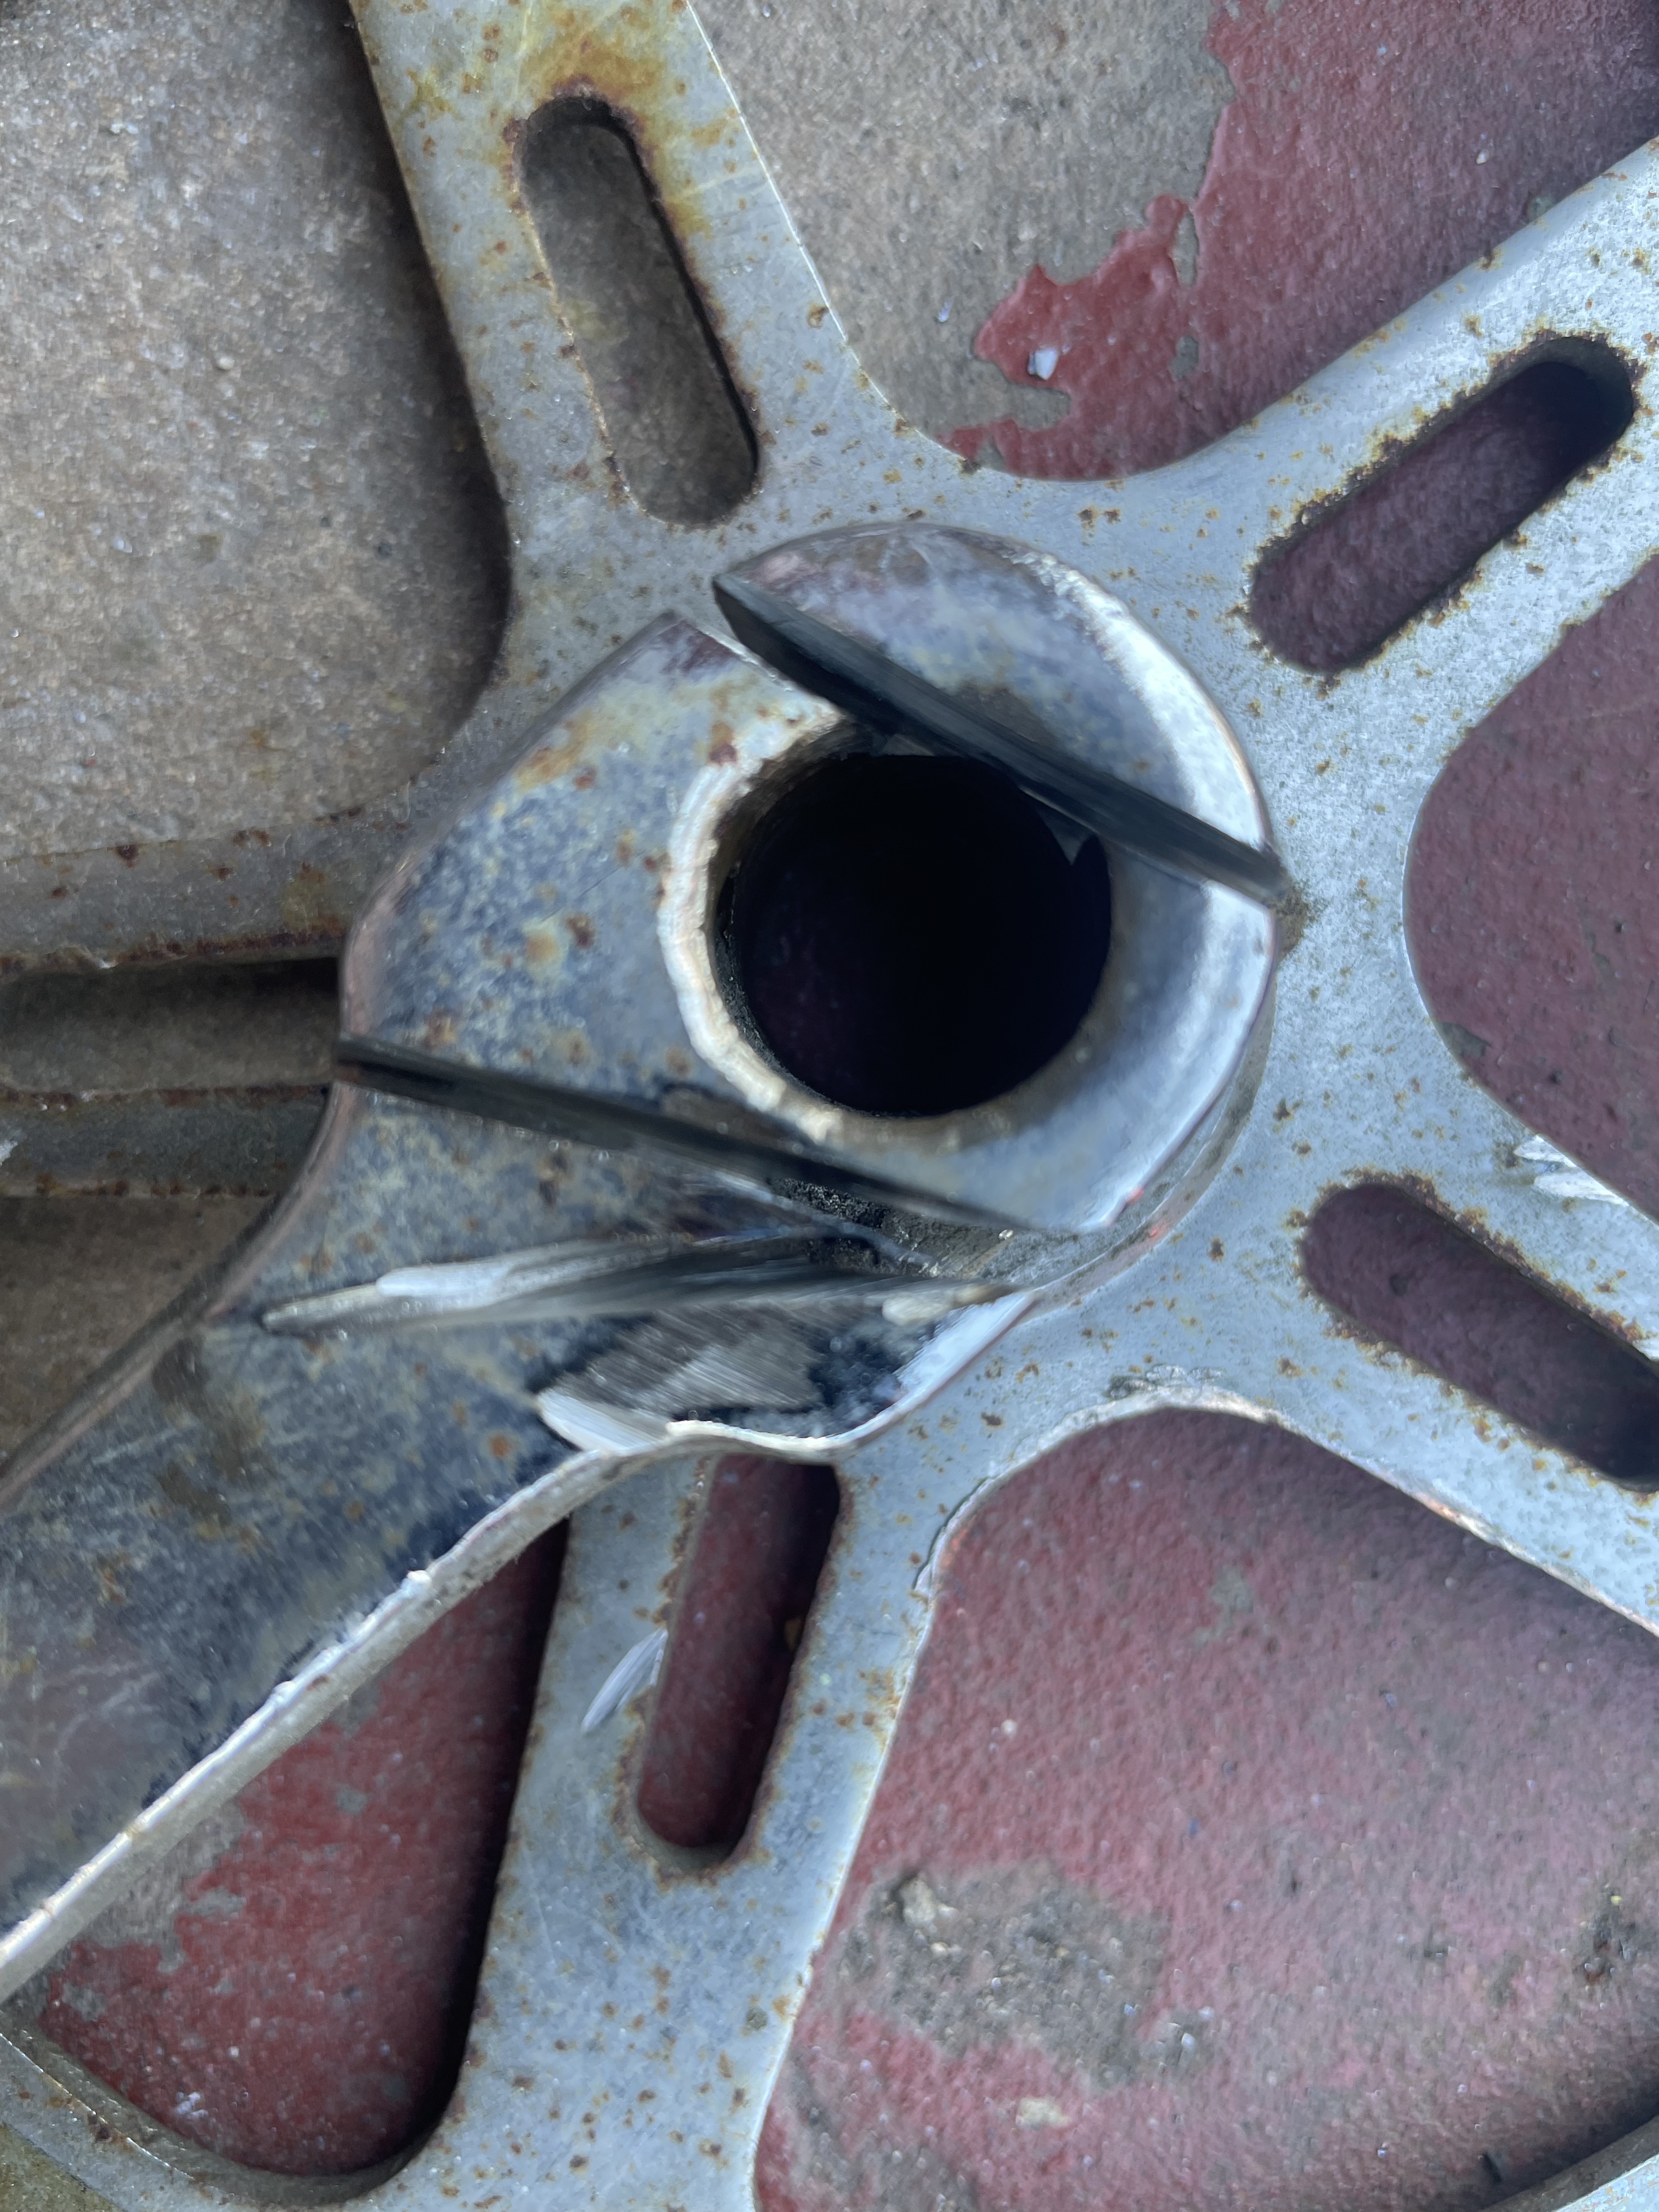
Some more money was obviously going to have to be thrown at this ‘cheap’ project, so late one evening long after my better half had retired to bed some furtive eBay purchasing happened ……..The gearing issue was dealt with by ordering the biggest single ring crankset I thought I could get away with along with a cheapish cartridge bottom bracket which I had to guess the width of, but thankfully it all seemed to fit. The old cotter pin crankset really didn’t want to come off on matter how big a hammer was used, but eventually succumbed to a less than gentle application of my angle grinder. The nice new drivetrain cured the low gearing issue and with the bonus of also junking the old crusty loose ball bearing bottom bracket. So we went form this :

Too this:
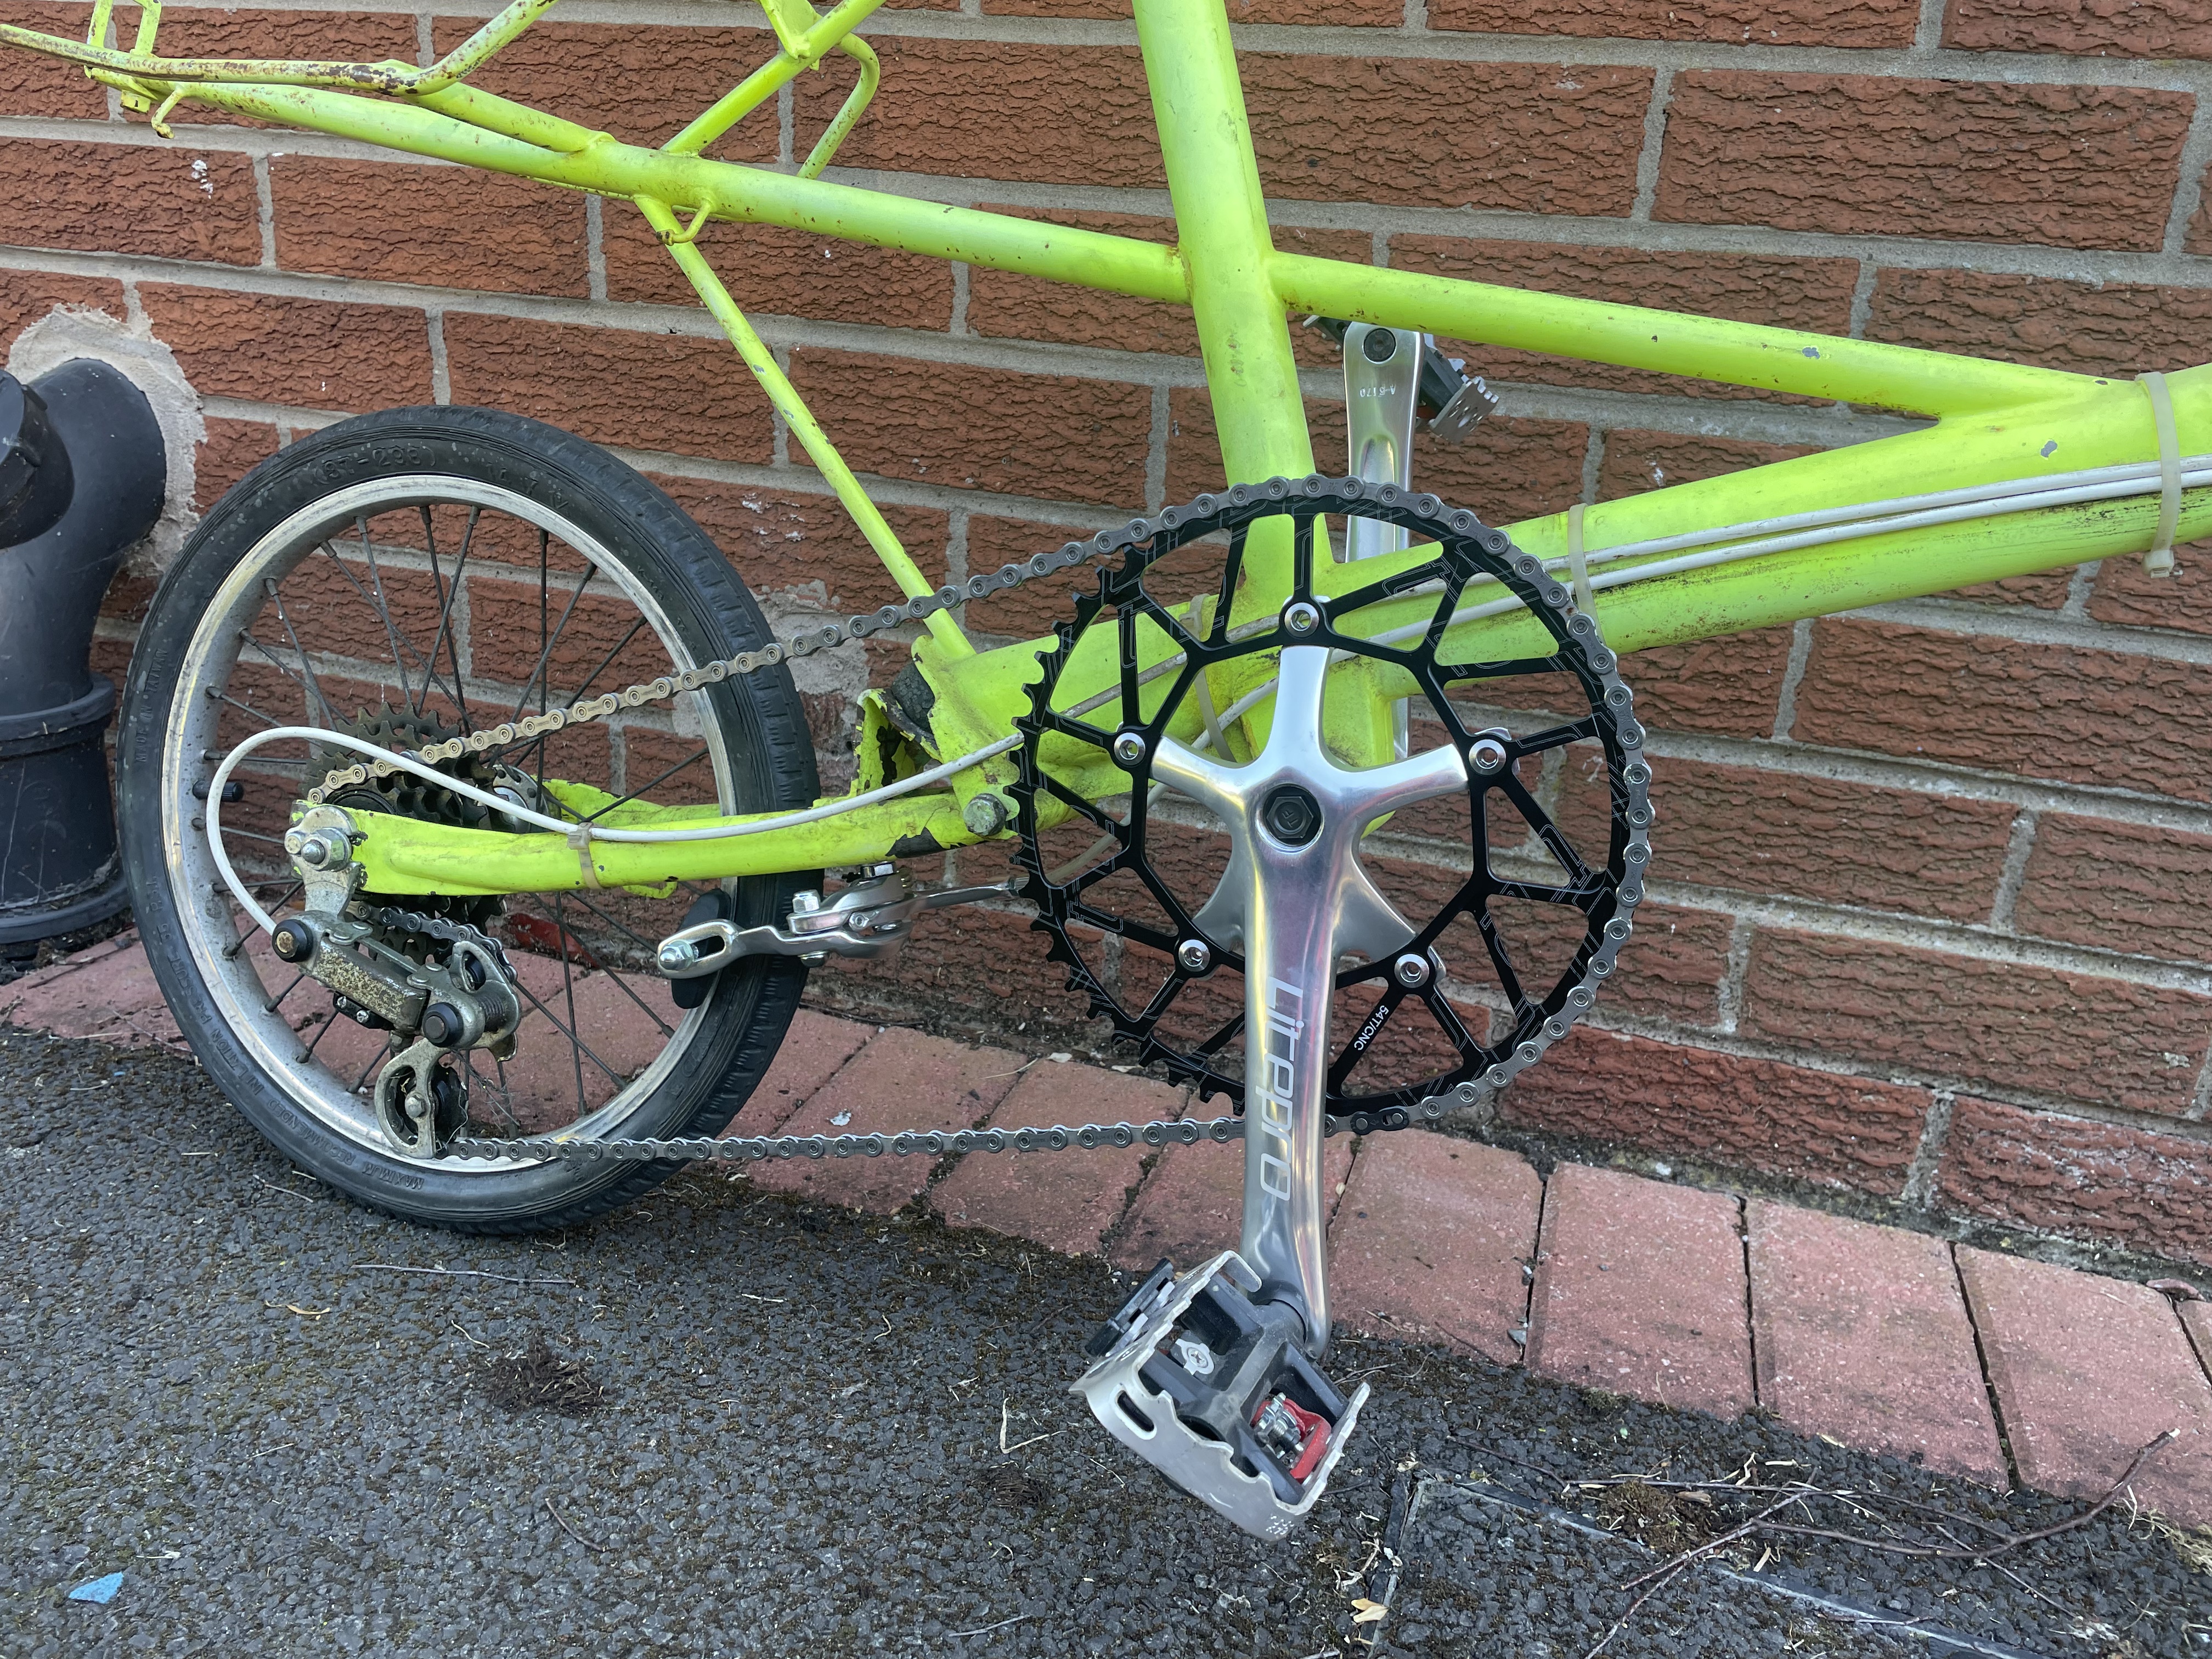
Much better …..! You can also see in this picture the shiny new dual pivot brake calliper nestling under the rear swingarm like a 1980’s mountain bike ‘U’ brake setup. This innovation (of which I was quite proud ) has the dual benefit of keeping the brake out of the way of the chainline, and of course looking cool. To finish off the transformation I garnished the Moulton with some double sided sPud/Flat pedals and some suitable more modern brake levers both of which came from the depths of my spares stash to thankfully keep the cost down.
I happily rode the Moulton around like this for a few weeks before making one final but significant change. If you remember from my opening words of purchasing justification I wanted a bike that I could stash behind the sofa on my Narrowboat when I wasn’t using it (the bike not the narrowboat) and the Moulton with its built in rear rack was just a little too wide, so I brought the bike home for its second appointment with my angle grinder and its equally aggressive friend the MIG welder. Now using a Mig welder even on its lowest power setting on nearly 50 year old thin walled bike tubing is a bit tricky, but with a lot of cursing, grinding and blobby welding the rear rack was now narrower than Mr Moulton had originally designed, but now it did fit behind the sofa!


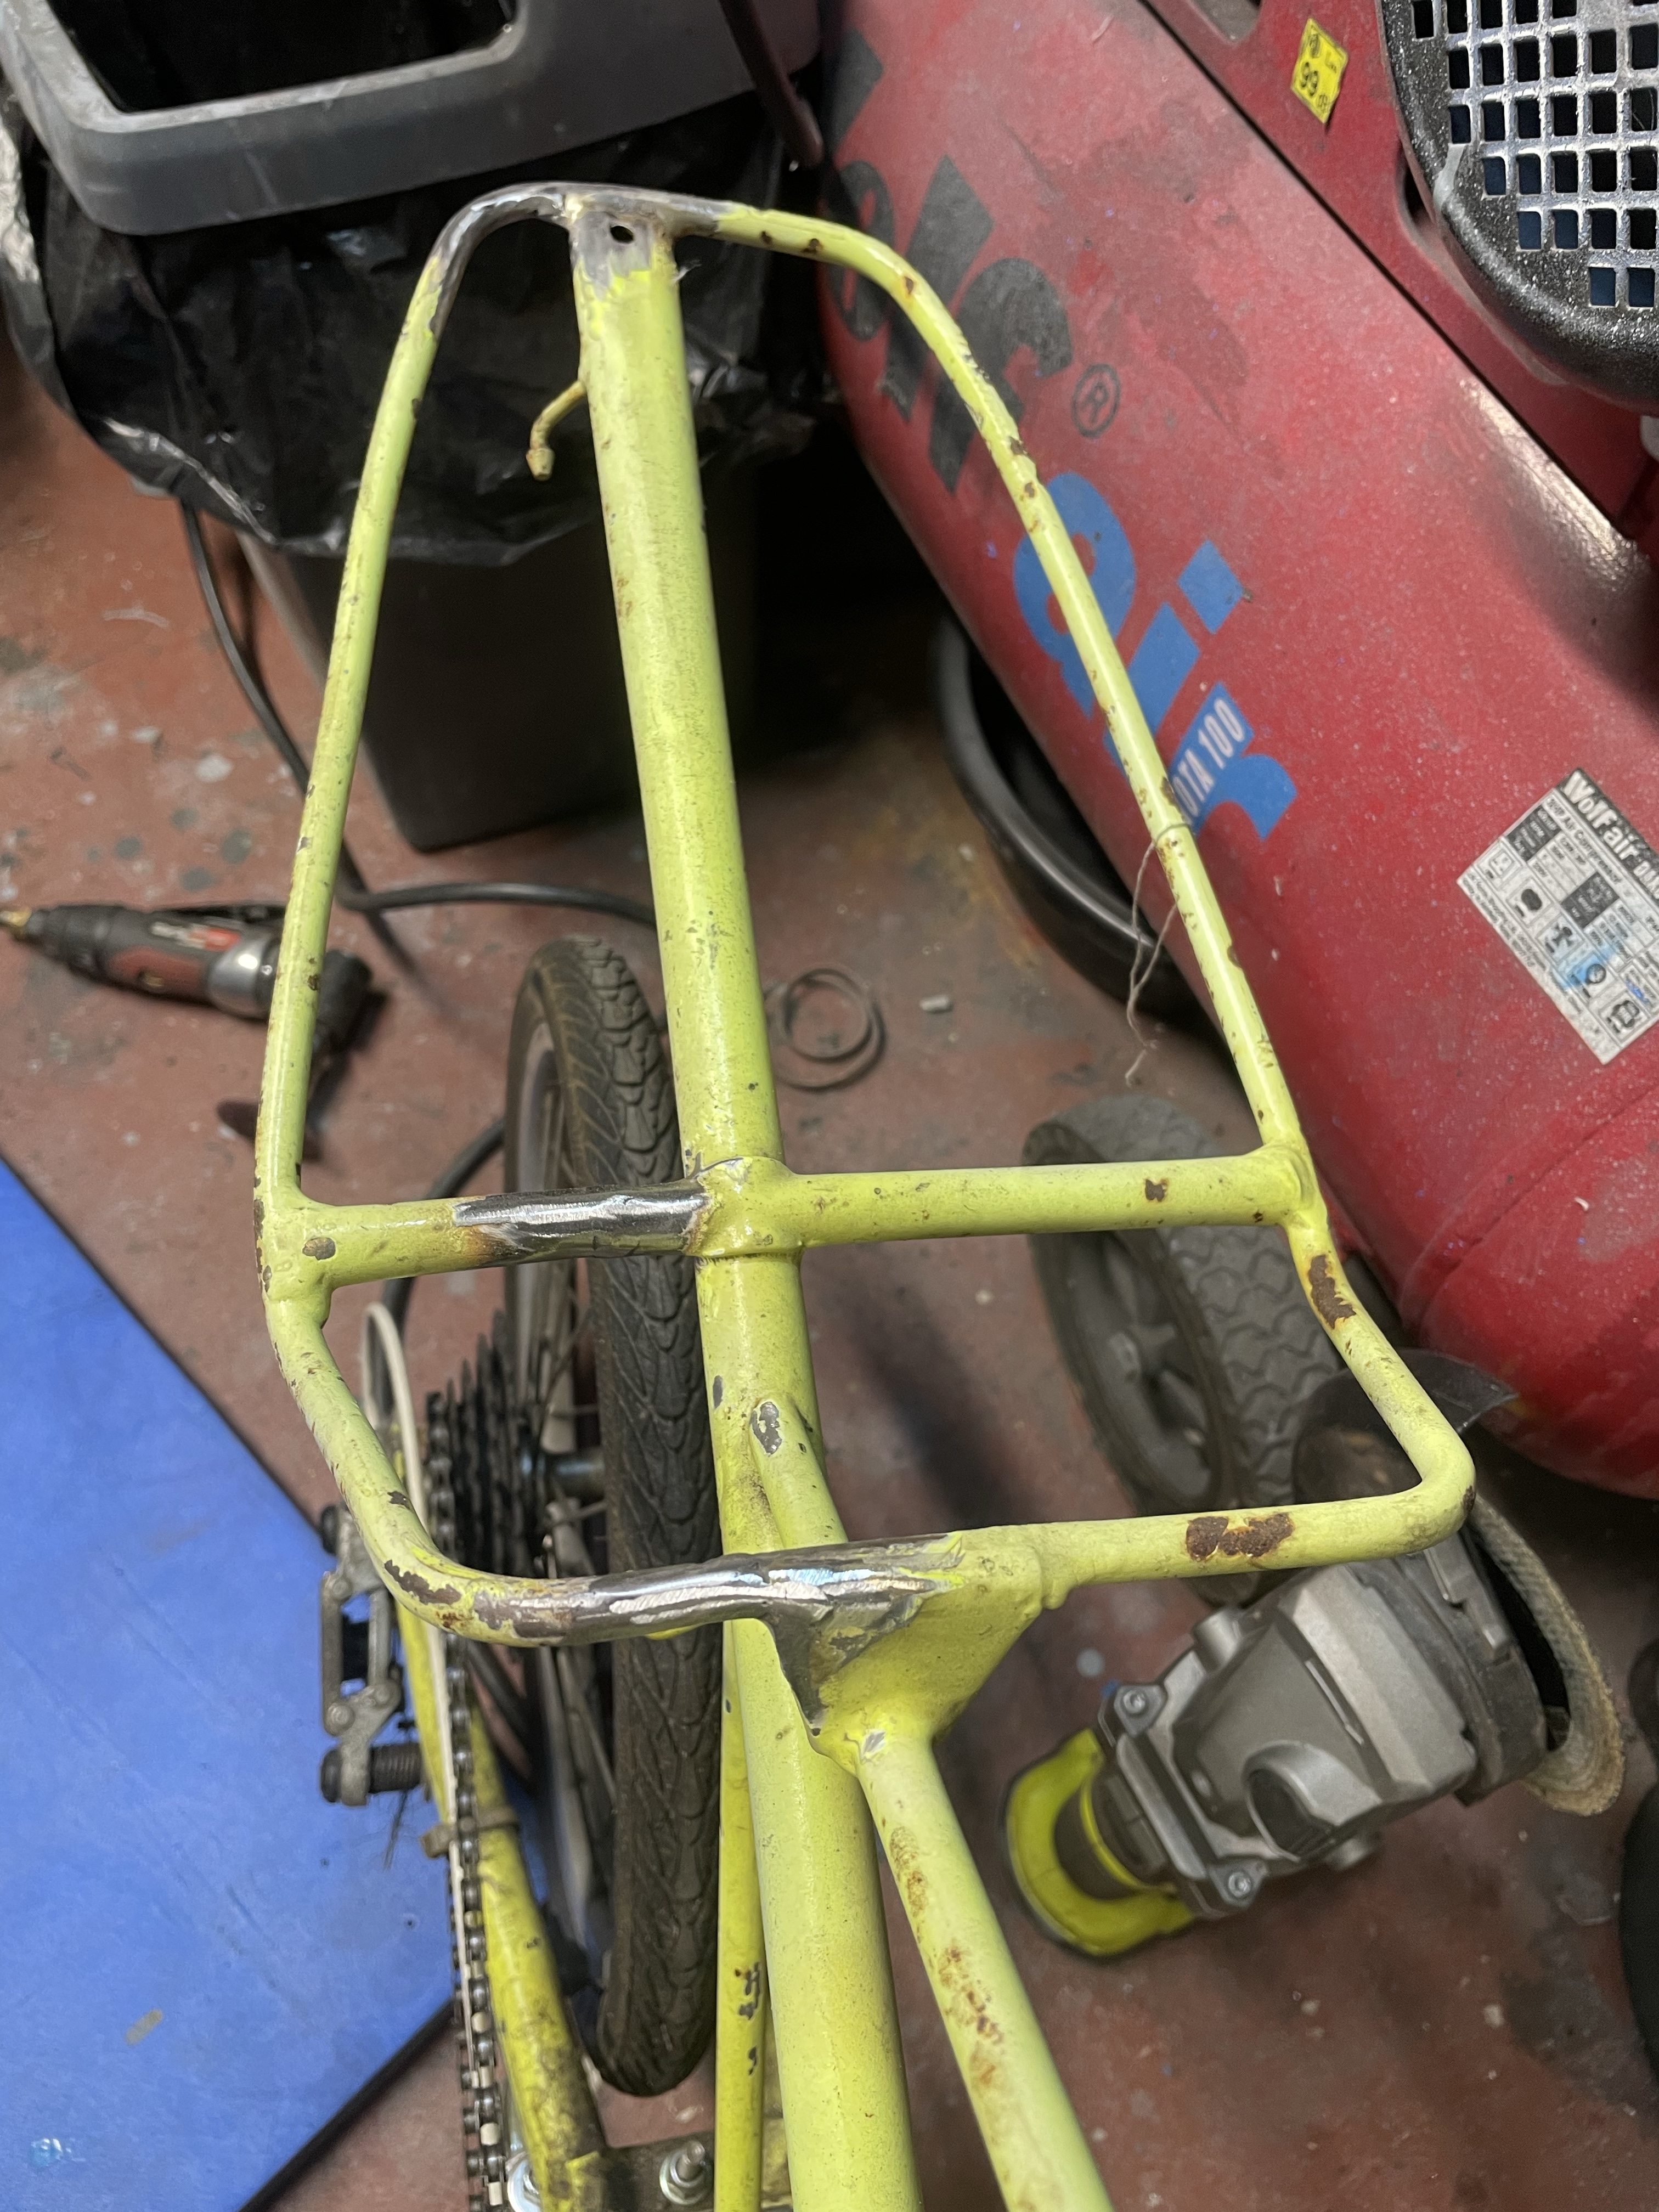
These last pictures show my slightly ‘agricultural ‘ welds, how anything can be made to look almost acceptable after a bit of attention with a flap wheel in a grinder, and the difference in width after I’d finished modifying the first half of the rear end. Of course it would have been a lot less bother to just simply cut the rack off, but I think its and integral and interesting bit of the bikes original design so I was keen to keep it if I could.
So that’s where the bike stands at the moment. It’s cost me far too much money and time, but it is fun to ride and its also very unlikely to ever get stolen because it looks like a complete shed and nobody knows what it is anyway….. Future plans? well the survivability of the wheels is a long term concern, but there is a plan in the offing which hopefully will address this but more on that in a future blog if anybody is interested.
For now I’m just going to enjoy zooming around to the shops / gym / post box on it……

I had a Moulton children’s bike in bright red in the late ’60s. My next full suspension bike was 1997.
LikeLike
Hi
brilliant article. I am trying to upgrade a Moulton f frame with cartridge bottom bracket.
could you please tell me how you fitted a cartridge bottom bracket. The Moulton bottom bracket shell is 75mm wide and different threading.
thanks
Neil
LikeLike
Hello, glad you enjoyed the post, my Moulton Mini has a standard 68mm BSA threaded bottom bracket shell so a standard Shimano cartridge bb screwed straight in. I believe some very early F frames used the 75mm shell with Italian threading which must be what you have. I’m not sure what the modern options for these frames are but there are some very knowledgeable Moulton Facebook groups and owners clubs out there on the interweb where I’m sure someone will know the answer, good luck!
LikeLike